Tapestry weaving is an ancient craft that combines artistry with technique. If you’re new to tapestry weaving, it’s essential to start with the basics. This guide will introduce you to fundamental tapestry weaving techniques, helping you embark on your creative journey.
Understanding Tapestry Weaving
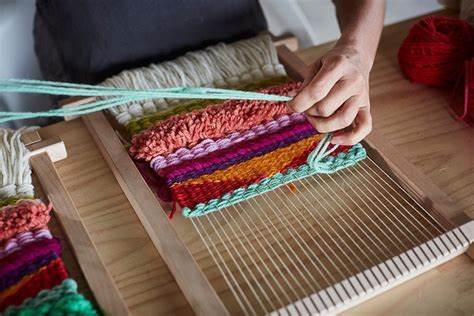
Tapestry weaving involves creating intricate patterns by interlacing yarns on a loom. Unlike other forms of weaving, tapestry is characterized by its use of discontinuous weft threads that are woven to create a picture or design. The warp threads remain in place throughout, while the weft threads are woven over and under them to form the design.
Setting Up Your Loom
Before you start weaving, you need to set up your loom. The most common type of loom for beginners is a frame loom. Here’s a simple setup process:
- Warp the Loom: First, secure the warp threads (the vertical threads) on the loom. These threads will form the base of your tapestry. Make sure they are evenly spaced and tightly secured.
- Prepare Your Yarn: Choose your yarn colors and textures. Tapestry yarns can be wool, cotton, or synthetic fibers. Make sure you have enough yarn to complete your design.
Basic Weaving Techniques
- Plain Weave: This is the fundamental technique where the weft thread is passed over and under the warp threads. It creates a simple, even texture. Start by placing the weft thread over one warp thread and then under the next. Repeat this process across the loom.
- Shed Technique: To create patterns, you need to form a “shed,” or opening between warp threads. This is done by lifting every other warp thread. Then, pass the weft thread through the shed and beat it down with a comb or shuttle. This technique allows you to create different patterns and textures.
- Color Changes: To change colors, simply stop weaving with one color and start with another. Make sure to secure the ends of the old color by tucking them into the tapestry. This technique adds depth and variety to your design.
- Weaving Shapes and Patterns: Use techniques like “inlay” (adding a pattern or design by weaving different yarns) and “tabby weave” (a simple over-under pattern) to create shapes and patterns in your tapestry. Practice these techniques to gain control over your design.
Adding Details
- Fringe and Edges: To finish your tapestry, you may want to add a fringe or neat edges. For a fringe, simply knot the ends of the warp threads. For neat edges, weave the ends of the weft threads back into the tapestry.
- Finishing Touches: After you complete weaving, remove your tapestry from the loom. Gently press or steam it to remove any wrinkles. You can also add a backing to give your tapestry a finished look.

Common Tips for Beginners
- Start Small: Begin with a small project to practice your techniques. Small tapestries are easier to manage and help you build confidence.
- Practice Tension Control: Maintaining consistent tension on the warp threads is crucial for a uniform tapestry. Avoid pulling too tight or leaving too much slack.
- Experiment with Yarn: Try different yarn textures and colors to see how they affect your design. Each type of yarn will create different effects in your tapestry.
- Seek Inspiration: Look at other tapestries for inspiration and technique ideas. Study different patterns and designs to broaden your understanding.
Conclusion
Tapestry weaving is a rewarding craft that allows you to create beautiful, textured art. By starting with basic techniques and practicing regularly, you can develop your skills and create stunning tapestries. Remember to be patient with yourself as you learn and enjoy the creative process.


